
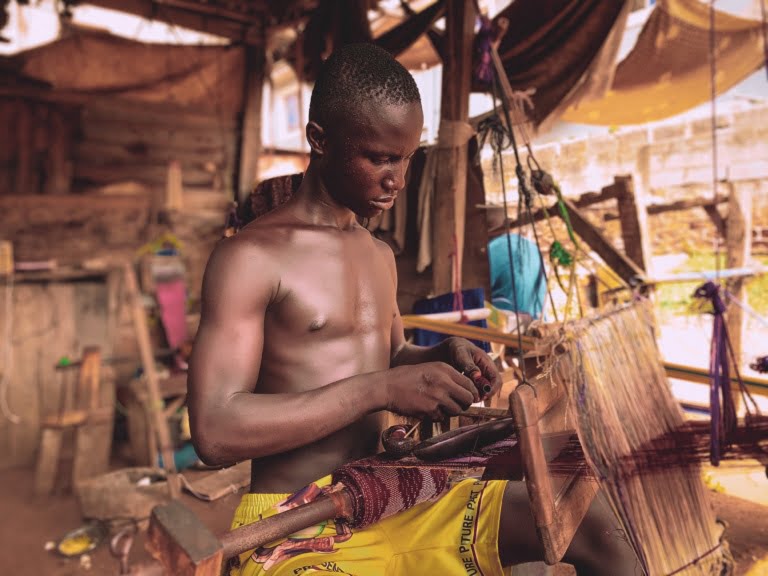
How Kente Cloths Are Made
The creation of a single piece of kente cloth is a labor of love, skill, and patience that can take anywhere from several days to several months to complete. Each step in the process — from thread preparation to the final finishing touches — is performed by hand, using techniques that have been passed down through generations of Ashanti and Ewe weavers. Understanding how kente is made deepens our appreciation for this extraordinary textile and the artisans who bring it to life.
Step 1: Thread Preparation
The journey of every kente cloth begins with the preparation of threads. Traditionally, weavers used locally sourced cotton and wild silk (produced by the Anaphe moth). Today, cotton and rayon threads are most commonly used, with silk reserved for premium pieces.
- Dyeing: The threads are dyed in the desired colors using both natural and synthetic dyes. Natural dyes are derived from plants, bark, roots, and minerals — for example, indigo for blue, kola nuts for brown, and bark from the badie tree for red. The dyeing process requires expertise to achieve consistent, vibrant colors that will not fade over time.
- Skeining and winding: After dyeing, the threads are wound into skeins (loose bundles) and then transferred onto bobbins or spools suitable for use on the loom. This step ensures that the threads are organized and free of tangles.
- Warping: The warp threads (the longitudinal threads that form the backbone of the cloth) are measured and arranged on a warping frame. This determines the length and width of each strip. Consistent tension across the warp is essential for a quality weave.
Step 2: Setting Up the Loom
Kente is woven on a strip loom — a narrow, horizontal loom that produces cloth in strips typically about four inches (10 centimeters) wide. The strip loom is the defining tool of kente weaving, and its design has remained largely unchanged for centuries.
Setting up the loom involves:
- Threading the heddles: The warp threads are passed through heddles — small loops of thread or wire attached to harnesses. The heddles allow the weaver to raise and lower specific warp threads to create the pattern.
- Positioning the reed: A comb-like device called a reed (or beater) is used to push the weft threads tightly against each other after each pass, ensuring a dense and even weave.
- Tensioning: The warp is stretched between a front beam and a back beam, with weights or a tensioning mechanism to maintain consistent tightness throughout the weaving process.
Step 3: Pattern Design and Thread Arrangement
Before weaving begins, the weaver must plan the pattern. In traditional kente weaving, patterns are not drawn on paper — they exist in the weaver's memory, passed down through oral tradition and practice. The weaver determines:
- The sequence of colors for each strip.
- The width and spacing of color blocks within the pattern.
- How adjacent strips will align to create the overall design of the finished cloth.
This planning stage is critical because kente patterns are created through the interplay of colored weft threads against the warp. Unlike printed fabrics, where patterns are applied to the surface, kente patterns are structural — they are woven into the very fabric of the cloth.
Step 4: Weaving the Strips
This is the heart of the kente-making process. The weaver sits at the loom and begins passing the weft threads (the横向 threads) through the shed — the opening created when certain warp threads are raised by the heddles.
- Picking: The weaver uses a small, flat tool called a shuttle to carry the weft thread through the shed. Different colored shuttles are used for different sections of the pattern.
- Beating: After each pass of the shuttle, the weaver uses the reed to beat the weft thread firmly into place. This creates a tight, even fabric.
- Changing colors: To create the pattern, the weaver switches between different colored weft threads at precisely calculated intervals. This requires meticulous counting and spatial awareness.
- Maintaining tension: Consistent tension on both the warp and weft is essential for a smooth, even cloth. The weaver adjusts tension continuously throughout the process.
A skilled weaver can produce approximately three to four inches of kente strip per hour, depending on the complexity of the pattern. A simple pattern may be completed more quickly, while a complex design with many color changes can take significantly longer.
Step 5: Joining the Strips
Once all the individual strips have been woven, they must be joined together to create a full piece of kente cloth. This is done through a process called strip sewing.
- The strips are laid side by side, carefully aligned so that the patterns in adjacent strips complement each other.
- They are then sewn together using a needle and thread, with the seams hidden along the edges of the strips.
- The alignment of strips is crucial — even a slight misalignment can disrupt the overall pattern. This step requires patience and a keen eye for detail.
The number of strips needed depends on the intended size of the cloth. A standard kente wrap may use 12 to 24 strips, while a full ceremonial cloth may require even more.
Step 6: Finishing
After the strips are joined, the kente cloth undergoes final finishing:
- Trimming: Loose threads are trimmed, and the edges are cleaned up.
- Washing and pressing: The cloth may be gently washed and pressed to remove any loose dye residue and to give it a smooth, finished appearance.
- Quality inspection: The finished cloth is inspected for consistency, color vibrancy, and structural integrity. Any imperfections are addressed before the cloth is ready for sale.
How Long Does It Take to Make Kente?
The timeline for creating a kente cloth varies significantly based on several factors:
- Pattern complexity: A simple striped pattern may take a few days, while a complex design with multiple colors and intricate motifs can take weeks or even months.
- Cloth size: Larger cloths require more strips, which means more weaving and more assembly time.
- Weaver's skill level: Master weavers work faster and more efficiently than apprentices, though even the most experienced weavers respect the time that quality requires.
At Hinkro Kente, each piece is given the time it needs to be completed to the highest standard. There are no shortcuts — every thread is placed with intention, and every strip is joined with care.
The Artisans Behind the Art
Understanding how kente is made reminds us that behind every beautiful cloth is a human being — a weaver who has spent years perfecting their craft. In Bonwire and surrounding villages in Ghana, weaving is a family tradition, with skills passed from parent to child. Supporting companies like Hinkro Kente means supporting these artisans and their families, ensuring that this extraordinary art form continues to thrive for generations to come.
Final Thoughts
The next time you see a piece of kente cloth — whether draped on a graduate, wrapped at a wedding, or displayed as art — take a moment to appreciate the extraordinary journey it has taken. From raw threads to a finished masterpiece, every kente cloth is a testament to human creativity, patience, and the enduring power of cultural tradition.